SeaBomb - Down The Rabbit Hole (Ambient Lighting)

If you’d read my blog post on PBR (Physically Broken Rendering) you’d know I was cautious of the laundry list of features needed to implement Physically Based Rendering. I’m going to state right off the bat, I’m not there yet. I have however, started to make a dint in ambient lighting.
I’m not going to lie, this has been a lot of work, for probably something I could have shipped without. However, the Technical Artist in me couldn’t let it go. Feature creep much anybody? Yup, so lets dive down the rabbit hole.
Initial Light Sources

Ambient lighting can be thought of as the light from the sky and any light reflected off everything else in the scene. To even start simulating it, I need to already have some lighting contributing to the scene.
I already had a few lighting sources:
- Point lights, as discussed in my Physically Broken Rendering blog post.
- Emissive objects.
I quickly added a few more light sources:
- Spotlights with shadow maps.
- A sun light with shadows.
- A pre-rendered sky box.
This at least covers the sun and sky, as well as a lot of different man made light sources. I didn’t bother simulating a sky in real time, as I figured there really isn’t much point in going over kill on this for a top down twin stick shooter.
Ambient Specular

The back bone to any Physically Based Renderer is a solid fall-back for the indirect specular lighting. As is pretty standard in many renderers, I’ve stuck with cubemaps as the solution for this.

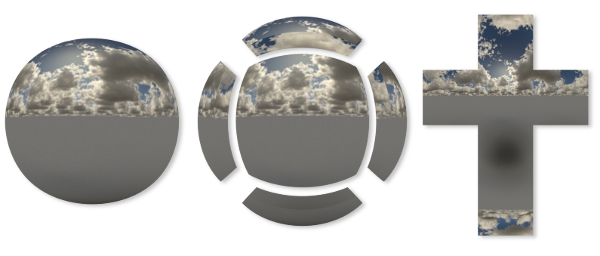
Cubemaps are 6 textures that represent a cube that can be looked up with a direction.
In addition to this, you can use the textures mip maps to store approximations for different levels of roughness which can be looked up using Tex2dLod in the shader.

There are some clever ways of pre-filtering a cubemap that allows you to do a fairly nice, approximation of specular lighting at any roughness (or you could cheep out and simply auto-generate mip-maps). I won’t go into the gory details, as this has been covered pretty extensively in multiple posts online:
- The best example of this is by far is by Brian Karis of Epic Games in his Real Shading in Unreal Engine 4 write up, and there are some detailed notes how they filter cubemaps.
- Arthur Rakhteenko also gives a good high level overview of this works in his GPU cubemap filtering blog post.
- Sergey Marasov has a nice write up on this in his IBL blog post.
- Sebastien Lagarde provides a modified version of ATI Cubemap Gen that will filter cubemaps better. He also explains all of his changes he implemented in great detail in his AMD Cubemapgen for physically based rendering blog post
Aside from filtering the cubemaps, my biggest challenge was re-factoring my renderer to be able to render cubemaps in a background thread while the level is being generated. Performance is a real issue here, so I have to keep my cubemaps small enough to be manageable.

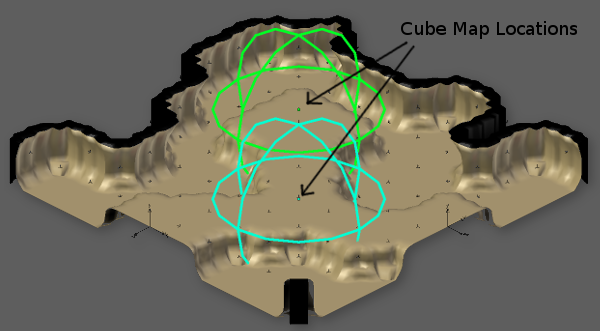
I set up a Cubemap system in my ECS and used locators in the procedural level parts to mark where cubemaps should be placed. In addition, I added another component to flag objects as contributing to the baked cubemaps. I didn’t want enemies or any objects that will later move, to show up in a static cubemap.
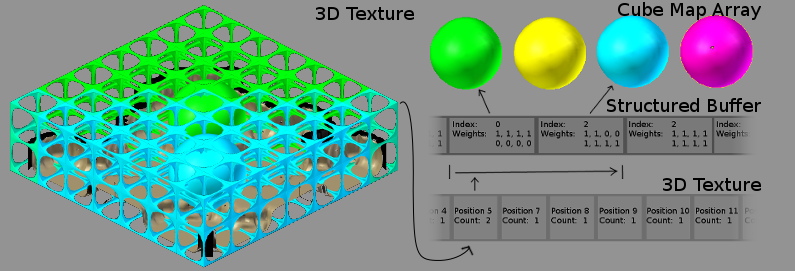
Each cubemap is rendered into a cubemap array and the mip maps are generated using a compute shader. I then create a 3d texture that covers the bounds of the level, along with a structured buffer. The 3d texture contains an offset into the structured buffer, and the number of items in the structured buffer for that cell. While the structured buffer contains the index of a cubemap along with the amount it effects each corner of the 3d texture cell.
Later, in my lighting shader I work out what cell the current pixel is in, then sample that cell of the 3d texture collecting the offset and count.

I then loop through the structured buffer starting at the offset for the count of cubemaps that affect the cell. Using the index I look up the value of the appropriate cubemap from the cubemap array and then multiply it with the weight from the structure buffer for each corner.
After, I divide by the total weight for all the corners, and then blend all the corners together using the location inside the cell. The cell sizes in the 3d texture are pretty coarse, so the blending winds up looking fairly natural. Usually most cells will only contain one cubemap, so this also winds up being reasonably fast.
Ambient Diffuse

The bottom mip maps of the cubemaps are a reasonable approximation for diffuse illumination, so I simply do the sampling again for the diffuse ambient. It sort of winds up being a very poor approximation of global illumination. However, it’s infinitely better than doing nothing. Before I ship I’ll likely try and convert this over to spherical harmonic values in a different 3d texture to get nicer blending and a better approximation of GI.
Screen Space Ambient Occlusion

I’ve implemented SSAO before, so I quickly read over a few blog posts (David Lenaert’s blog on Horizon Based Ambient Occlusion was particularly interesting) and sat down and wrote a few different shaders. One to calculate the SSAO, another to blur it without crossing depth boundaries and another to upscale to full screen (so I could do the expensive calculations at half resolution).
Screen Space Local Reflections

I had an implementation of Screen Space Reflections up and running very quickly for smooth objects. However, doing a PBR compliant implementation that worked well with roughness proved to be fairly difficult.
It always looks nice in a test scene with a smooth flat ground, but as things get rougher, the noisiness of any bright objects quickly becomes unacceptable. I read up on what to do, but AAA solutions are very involved, and usually wind up including some sort of temporal filtering to avoid the noise.
Unwilling to put in the time and effort I settled for darkening the SSR the rougher the surface gets, while also fading it out. This approach really isn’t very PBR, but I’m happy with how it looks. Additionally, as a one man band I definitely have to make compromises!
Complete Lighting

Unfortunately, my current scene didn’t really have any objects that benefited much from the SSR, so I did what any self respecting Game Dev would do and added puddles everywhere on the ground :) While my approximations are currently fairly coarse and my screen space reflections are not terribly physically accurate, I am really happy with the results.
More importantly, the indirect lighting is fast enough to bake on load while my levels are procedurally generating.